Using wheel spacers or «wheel adapters» or «flange adapters» have long since become a common practice among many motorists. For the sake of simplicity, in this article we will call them «wheel spacers».
First of all, I want to say that you must have compelling arguments in favor of installing wheel spacers, and clear understanding of all possible issues connected with them.
The most important thing is to choose the right wheel spacer and competently install it — then you are not going to have any problems.
The pros of wheel spacers

- For changing the wheel offset. A lot of people simply like the cool look of a positive wheel offset. Also, if you purchased a new set of wheel discs, and they rub against the caliper or other elements of the suspension, a 3-5-10 mm increase in the wheel offset by using a wheel spacer can be a solution.
- For changing the pitch circle diameter, in order to install disks with a different bolt pattern.
- For widening the vehicle’s stance. This is a very popular tuning technique because a wider wheelbase ensures a better handling response.
The cons of wheel spacers
- The load on the hubs increases and the wheel bearing suffers. In fairness, it must be said that with the correct installation, operation and the right size of the wheel spacers, the load is minimal and the hub resource can handle it. At the same time, you need to take into account the actual load of your vehicle.
- Vibration of the steering wheel or insecure wheel mounting. If the correctly chosen wheel spacer is competently set up, no such problems should appear. If you hear hum or feel the wobble, check the correctitude of spacer mounting.
Things you should pay attention to
- Wheel spacers larger than 5 mm require longer lug studs. If you have installed a wheel with spacers on stock studs, don’t be fooled by the fact that visually the wheel is securely fastened. When your vehicle is loaded to capacity, an emergency maneuver performed at high speed may lead to a stud failure.
- Purchasing cheap spacers is definitely something that you don’t want to do. The quality of execution and the quality of metal are crucial.
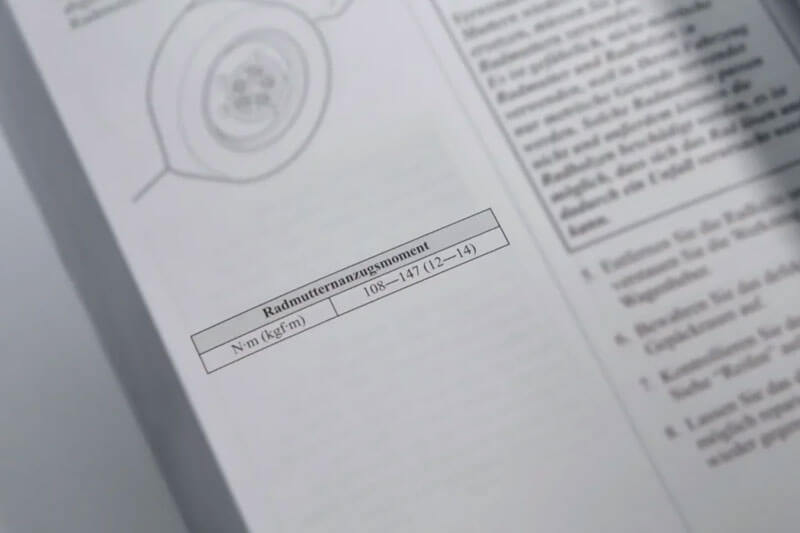
- Since the centering and tightening of the wheel spacers is also extremely important, you should contact a trusted car service center.
- Any play between the wheel disc and the spacer is totally unacceptable. Do not try to remedy it by tightening the lug nuts too much. This is sure to result in vibration, premature tread wear, and hub damage.
Types of spacers
Of course, the market is brimming with various offers. The spacers may vary in type and in material that they are made of.
Let’s try and make some sense of this variety.
1. Universal wheel spacers (not recommended)
Size: 3 mm, 5 mm, and 10 mm

In my opinion, the most common mistake is using the wrong type of spacers. The number of openings on the wheel spacer testifies not so much to its versatility as to its actual purpose. These are the so-called «fitting» or «provisional» spacers, which are meant to help you to understand exactly how much space you need to add to the wheel offset, but are by no means designed for permanent use.
The problem with this option is that sometimes you don’t have an opportunity to properly center the wheel, which will inevitably result in wobbling during the driving.
Besides, if you install a 10mm spacer of such type, it may cover the hub centric ring, and, again, you will not be able to center the wheel properly.
Also, a 10mm spacer requires longer bolts or longer studs. Even if the original thread does engage, the mounting will still be unreliable and potentially dangerous.
2. Slip on spacers (conditionally recommended)
Sizes:
from 3mm to 10mm — lug centric (floating)
from 3mm to 10mm — hub centric


The openings are made specifically to fit your vehicle. These spacers have a center bore that matches the car’s hub size, and a lip on the outer edge of the spacer that matches the center bore of the wheel that you may be using. This, in turn, also helps to center the wheel on the hub.
When using such type of wheel spacers, the important thing to do is to replace the OEM lug bolts or studs with longer ones.
3. Bolt on spacers with threaded inserts

Size: from 15mm to 100mm, and sometimes even wider…
This type of wheel spacers makes it possible not only to push the wheel further out from the vehicle by increasing the wheel offset but also to change the bolt pattern in order to properly fit wheels of a different type.
Bolt on spacers with an eccentric shaft (recommended)

One of the studs of such wheel spacer will inevitably match the hole on the hub and the hole on the wheel.
Such studs are used to change the 4 bolt pattern to the 5 bolt pattern, and this is where the eccentric shaft comes in particularly handy.
If you try to install a usual 4 to 5 lug adapter without such a stud, one of the holes on the wheel will overlap with one of the holes on the hub at any position of the wheel.
The problem of poor-quality wheel spacers
When choosing your wheel spacers, pay attention to the quality of execution. If inclusions are seen or the metal surface is torn, this is a sure sign of poor quality, and purchasing such wheel spacers is a bad idea.
Also, you need to pay attention to the thickness of the spacers where it really matters.

This example shows a wheel spacer of a very poor quality of execution and obvious manufacturing issues.
Pay attention to its thickness.
You need to be aware of the fact that a wheel spacer is essentially a flange that is significantly weakened with every extra hole you drill in it.
While the captive stud holes are generally OK, there are often multiple issues with the PCD bolt holes. Combined with a large wheel hub, the wheel spacer may end up getting critically thin areas. The spacer was drilled to fit the wheel hub from the inside, and it was drilled to fit the new wheel bolt pattern on the outside — and the wall between the holes may become 1mm millimeter thick. Which is extremely dangerous, especially for low-quality alloy.
A careful driver could still get away with it, but such wheel spacers are often used by drift enthusiasts who subject their cars to a lot of lateral pressure, and such mistakes lead to big problems.
The process of installing the wheel spacers
These guidelines are provided for your general understanding of the process. I strongly recommend that you refrain from installing the wheel spacers on your own, and entrust this job to professionals.
1. Preparation


2. Trying it on


3. Installation

4. Checking it


5. Reinstalling the wheel

After the wheel is reinstalled, it is advisable to check the wheel for rubbing against the fender or suspension elements.